Mud & Orchard
  • The Canning Table
  • Miscellany
  • About

Blueberry Cheesecake Ice Cream

15/3/2012

2 Comments

 
Whilst Skyping with my Mother a few weeks ago, she asked what type of sweets we should cook up while visiting.  I mentioned that Ellie is gaga for blueberries, and I was soon reading one doozie of a recipe that Mom had found. 
Picture
I loved this recipe for it's simplicity and the fact that you didn't need an ice cream machine - let it cool in the fridge- for it to come together.  With a few ingredients, some child labour and a bit of patience, we were quite a happy bunch with bowls of ice cream in our laps.  The taste was exactly what you would hope for, sweet with a bit of tang from the cream cheese.  We ended up popping it in the freezer for a bit, but it would have been delicious either way. 
Picture
Picture
2 Comments

Second Best

8/3/2012

3 Comments

 
I love popcorn.  The second the girls have stopped their night time rumblings, I'm off to the kitchen to pop some kernels on the stove top.  Then Aaron and I settle happily on the couch and watch old episodes of Arrested Development. Unless, of course, I've forgotten to replace the popcorn and I'm searching in the pantry for something else to munch on.  Enter roasted chickpeas.  
Picture
Chickpeas are quite slutty and will happily accept any seasoning your throw at them.  You could go the Moroccan route and add some cumin, cinnamon and ground coriander.  Or you could go Mediterranean with lemon pepper and oregano.  I went a slightly Thai route and the results were delicious.  Crunchy on the outside with a slightly creamy centre.  

Roasted Chickpeas
  • Preheat your oven to about 375 degrees and line a baking sheet with parchment paper.
  • In a measuring cup add a few tablespoons of the oil of your choice and whisk in your seasonings.  
  • For the Thai flavours, I used a 1/4 teaspoon of sesame oil, 3 tablespoons canola oil, a tablespoon of soy sauce and another tablespoon of sweet chili sauce.  
  • Drain and rinse two small cans of chickpeas and put them in a bowl.  Add your seasonings and stir.  
  • Pour the chickpeas on a baking sheet in a single layer.  
  • Bake for 30-40 minutes until golden brown. Give them a stir halfway through.    
  • Cool slightly and serve.
The bigger problem now is that we're all out of Arrested Development episodes.  How did this show get cancelled?  I already miss Buster and his hook.  
Pin It
3 Comments

Angry York Brownies

19/2/2012

2 Comments

 
Aaron had an interview for a tenure track position at York University in Toronto. As gorgeous as living in Europe sounds, we miss our friends and family. As such, we were "saddened" at the news that the position had been offered to someone else.  

If we were more organized people, we would have had an emergency stash of chocolate, or ice cream or something else equally comforting and bad for us. Instead, we had a leftover square of baker's chocolate, dregs of cream cheese in the fridge, and some off brand Nutella. The perfect ingredients to make a lovely batch of Nutella & Cream Cheese swirled blondies.  

What I didn't account for is just how much emotion can alter one's approach to baking. The pan snarled at me, I snarled back and flung tablespoon dollops of hazelnut spread at it. I baked the shit out of it. And the result? An overcooked piece of cake with an edible topping, not even worthy of a plate.
Picture
Yup, those are teeth marks on the spoon. There was no decorum in the destruction of this failed dessert.
Now that that is over with, it's time to focus on the positive. Waiting for an answer from York was the hardest part, and now we can move on. This is our home now, for the foreseeable future at least, and I'll work harder at making it just so. Visitors are always welcome. I'll give you a comfy bed and something good to eat. Because despite appearances to the contrary, I can be a pretty good baker. Apparently only when I'm in the mood to do so. 
2 Comments

400 grams of Chocolate

8/2/2012

9 Comments

 
Aaron is due to give a talk to the department in a weeks time, and it's customary to bring cake for the attendees.  Which means, actually, that it's customary for the wife to make a cake for the husband to bring for the attendees.  I don't know about men who bake, or men who aren't married, or women who are mathematicians, so we're leaving them out of this equation.  

The first time he gave a talk, he only found out afterwards that he was expected to bring a treat.  Man, was I scolded! (Not really, at all.)  So this week, I've been testing out my baking skills as to not disappoint the department this time around.

Last night I made a Blood Orange Chocolate Ganache Tart, and I will not be serving it to the department.  It is just too fucking special.  It does take forever to prepare, but the reward is worth it.  This is pure chocolate, tempered only with a cup of whipping cream and 4 tablespoons of orange syrup.  If you don't like dark chocolate, or chocolate and orange, you're not going to like this. But if you do, oh goodness.  Watch out.
Picture
Picture
Picture
After chopping up two bars of dark chocolate, I re-read the recipe and sent Aaron out for two more.  Meanwhile, a sliced orange simmered in a simple syrup for over an hour, turning itself into the best candy ever.  I've become more comfortable with pastry since making my Babcia's Cherry Tarts back in early fall, so the tart shell came together nicely and just silently waited to be filled. 

I heated a pot of whipping cream to boiling and drowned my chocolate pieces in it, stirring to melt.  I arranged the orange slices over the bottom of the tart shell, and added the left-over syrup to the chocolate ganache.  Then it was a simple pour into the shell, topped with a candied orange slice. All that was left to do was exercise an exceeding amount of patience until the tart set up.  
Picture


The recipe is from the Australian blog Jeroxie.
Picture
Picture
Pin It
9 Comments

How to become a Smug Mom in three easy steps.

2/2/2012

7 Comments

 
Peanut Butter Cookies
1 cup smooth or crunchy peanut butter
1 egg
1/2 cup sugar

1. Mix the ingredients until it looks like you can roll the mixture into little balls.
2. Make 24 of those little balls, put them on a parchment lined baking sheet.
3. Bake at 325 degrees for 10-15 minutes
Picture
Done! Smug Mom transformation complete.
Picture
7 Comments

Bananas I say!

23/1/2012

7 Comments

 
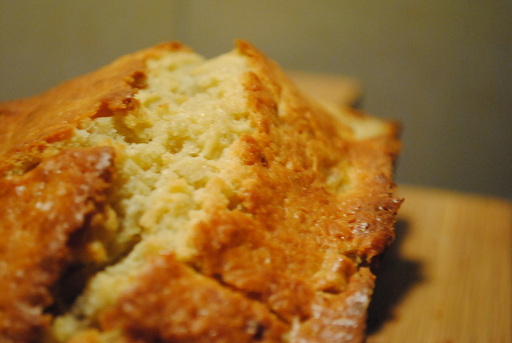
People are picky about their bananas.  Firm, slightly green, just ripe, slightly over-ripe, I know all kinds of banana eaters.  Including my daughter Eloise.  She LOVES bananas, for one day only, and then they sit on the counter and morph into ick.  Enter banana bread.  I usually use an old Joy of Cooking recipe, but I've been into the website food gawker and tried out a recipe from there, with a few little tweaks.  The end result was moist, not too dense and with good height.  Exactly like a first date should be.  Ahem.

Banana Bread
Adapted from Good Housekeeping circa 1962

1 3/4 cups flour
2 tsp. baking powder
1/4 tsp. baking soda
1/2 tsp. salt
1/2 tsp cinnamon
1/3 and 1 tbsp. butter
2/3 cup sugar
2 eggs
3 mashed bananas
1/2 cup yogurt, optional
Picture
1. Heat oven to 350 degrees and grease a 9″x5″3″ loaf pan.
2. Mix together flour, baking powder, soda, and salt.
3. With electric mixer cream butter and sugar, then add eggs until mixture is fluffy and light. (I added 1/2 cup of greek yogurt at this point)
4a. Add flour mixture alternatively with bananas until just mixed.
4b. Don't do 4a, life is too short.  Just mix it all together with a gentle hand.
5. Turn into pan.
6. Bake for 1 hour.
Picture
The kids loved it for breakfast.
Pin It
7 Comments

This is an entry about sandwiches. You've been warned.

19/1/2012

10 Comments

 
I'm a self proclaimed sandwich expert.  Before I learned to cook, I learned to make sandwiches.  I adored a crusty croissant with brie, honey mustard and black forest ham, and probably had it for dinner every night in my early twenties.  A pita wrapped around sliced turkey with sweet potato hummus, goat cheese and arugula is perfect.  I used to go to a Chinese restaurant every day after school with some friends and order a fried egg sandwich for $1.50.  

I really could go on, but I'm feeling pretty pathetic remembering all the special sandwiches I've had.  Oh god, there was also the year long love affair with Subway roast beef sandwiches with green peppers and pickles.  I'm done.  After this one:

I believe my love of sandwiches started in the most humble of circumstances.  My Mother, god bless her, was and still is a "don't talk to me until I have my coffee" kind of morning person.  She NEEDS that hour between her waking up and the rest of the household coming to life.  She was the type that if my brother and I were waking up at 6, she would set her alarm for 5.  
She is also very organized.  She knew the steps that needed to be taken between us waking up and us getting out to school.  Breakfast first.  For our entire childhood we would wake up to her shouting "Breakfast is ready!", not a nudge or anything else would rouse us out of bed.  

And what was this breakfast that I so fondly remember?  It was affectionately known as Burnt Toast. White bread with cheese whiz smeared on top and then put under the broiler until the fake cheese bubbled and turned black.  Cut in half, the cheese would ooze out and you could dip your crusts in that and feel pretty satisfied.  This breakfast of ours was the definition of a food jag, and now that I have kids of my own I feel REALLY sorry that we made my Mom make this so often.  I'm sure she wished that we were really into Muesli, but yuck.

I wrote all of this just to say, if you're craving a sandwich, have I got a good one for you! 
Picture
This is a focaccia sandwich with roasted red peppers, turkey and a mix of arugula, feta, olive oil and lemon juice.  The flavours were bright, the bread was both soft and crunchy, it was just plain good.  Give yourselves a break and make a sandwich for dinner tonight.  You'll be happy you did!
Pin It
10 Comments

Lemon Poppyseed Loaf

8/1/2012

8 Comments

 
The secret to this loaf is the yummy glaze that you pour over it immediately after taking it out from the oven.  It's a great recipe to impress your family on a rainy day, as it uses ingredients most of us have on hand.  I had leftover poppy seeds after making Ham & Cheese Sliders on Boxing Day, but you could omit them altogether if you just add an extra tablespoon of flour to your measurements.  

Picture
Here is the recipe as it appeared in Canadian Living.  I followed it faithfully up until they told me to wait 12 hours before eating it.  See above photo to understand why that wasn't about to happen. 
 
Ingredients
  • 1/2 cup (125 mL) butter, softened
  • 1 cup (250 mL) sugar
  • 2 eggs
  • 1-1/2 cups (375 mL) all-purpose flour
  • 3 tbsp (45 mL) poppy seeds
  • 1 tbsp (15 mL) grated lemon rind
  • 1 tsp (5 mL) baking powder
  • 1/4 tsp (1 mL) salt
  • 1/2 cup (125 mL) milk
Lemon Syrup:
  • 1/3 cup (75 mL) sugar
  • 1 tsp (5 mL) grated lemon rind
  • 1/3 cup (75 mL) lemon juice
Preparation

In large bowl, beat butter with sugar until light and fluffy; beat in eggs, 1 at a time, beating well after each addition.

In separate bowl, whisk together flour, poppy seeds, lemon rind, baking powder and salt; stir into butter mixture alternately with milk, making 3 additions of flour mixture and 2 of milk. Spread in greased 8- x 4-inch (1.5 L) loaf pan.

Bake in centre of 325°F (160°C) oven for 1 hour or until cake tester inserted in centre comes out clean. Place pan on rack. 

Lemon Syrup: In saucepan or microwaveable measure, warm together sugar and lemon rind and juice until sugar dissolves. With skewer, pierce hot loaf in 12 places right to bottom; pour lemon syrup over loaf. 

Let loaf cool in pan for 30 minutes; turn out onto rack and let cool completely. Wrap and let stand for 12 hours before slicing. (Make-ahead: Store at room temperature for up to 2 days or overwrap with heavy-duty foil and freeze for up to 2 weeks.)
Pin It
8 Comments

Gnocchi Poutine

31/12/2011

3 Comments

 
Before our trip to Canada my Mom had sent me a newspaper article rating about a half dozen cupcake shops in and around Hamilton.  The article came with instructions that we would hit up each and every one to do the taste test ourselves.  A bit grandiose of a plan, and inevitably we didn't set foot into even one of those places while I was home.

Another missed culinary opportunity was that we didn't go for poutine while we were home.  NY Fries may not do an authentic version, but it's delicious and readily available.  Fries in Germany come with mayonnaise or curry ketchup, so the craving for fries with gravy started growing.

I could have just made a batch myself.  I just feel that baked french fries aren't always worth the trouble and I don't like to deep fry only because I don't know what to do with the oil afterwards.  (Really, what do you do?  Throw it down the toilet?) So, I had a brilliant idea.  I really convinced myself that I had invented this, but it turns out, not so much.  Regardless of it's origins, this Gnocchi Poutine hit all the right spots, in a kind of refined way.  

1 pound gnocchi
1/2 cup crumbly cheese
1 cut of beef - I used a rib eye because it was on sale, but you could use a blade steak and it would still be tender and delicious because of the long cooking time
1 onion, sliced
1/2 cup red wine
1/2 cup water
salt & pepper


1. In a heavy pot, heat 1 T olive oil over medium high heat
2. Season your cut of beef with a generous coating of salt & pepper
3. Brown the beef on each side until there is a nice brown crust, about 3-5 minutes per side.  
4. Remove the beef and set aside.
5. Add the onion and sauté until semi-transluscent, about another 3-5.
6. Add the red wine and let it reduce for a couple minutes.
7. Add the beef back to the pot, add some water and put a lid on it. Turn the heat down to a simmer and leave it alone for at least an hour.  After that, feel free to toss and turn it and add more water if necessary.  Leave it in for another couple hours or until the beef comes apart with a fork.
8. Remove the beef and shred it with a fork.
9. Add your choice of thickener, I used gravy powder, to the stock and allow to thicken to a gravy.  
10. Add the beef back to the pot and stir.

Meanwhile, cook the gnocchi according to the directions on the package.  I used fresh so it only took a couple of minutes.

Add some gnocchi to a bowl, add the cheese and top with gravy. It was so yummy that I got over the fact that I'm not as brilliant as I thought I was when I "invented" this dish earlier in the day.  If I was ever feeling ambitious, I might sauté the gnocchi in a little brown butter to give it a bit of a crunch.  Give it a try and let me know what you thought!


Picture
Poutine can't help if it's an ugly duckling, so the picture might not do it justice.  Trust me, it was good!
Pin It
3 Comments

Some exciting news!

23/10/2011

2 Comments

 
So, I've just found out the reason why it has been so hard to lose weight here in Germany, despite all the walking and activity we've been up to.  
The German way of saying it is "zu viele Kartoffeln". Which doesn't mean "You're pregnant", but rather translates to "Too many potatoes."  
But I'm not letting it get me down.  In fact, my figure is so cooperative I can fit into any scarf I try on.  Go me!! 

Side note: Aaron, who loves to read over my shoulder, just said "I don't get it."  Adding that the above post is "Only funny if you know you're trying to be funny."  Just to clarify, I was trying to be funny. 
2 Comments
<<Previous
Forward>>


    Disclaimer* 
    There is no how-to for making jams and jellies on this site.  Maybe there will be one day.  For now, The Canning Table is a big wooden metaphor for preserving memories while my family and I explore expat life.

    Categories

    All
    Family
    Germany
    Good Food
    Musings
    Objectification
    Snapshots
    Travel

    Archives

    September 2013
    July 2013
    May 2013
    April 2013
    March 2013
    February 2013
    January 2013
    December 2012
    November 2012
    October 2012
    August 2012
    July 2012
    June 2012
    May 2012
    April 2012
    March 2012
    February 2012
    January 2012
    December 2011
    November 2011
    October 2011
    September 2011
    August 2011

    RSS Feed

Powered by Create your own unique website with customizable templates.